Introduction
What is Inspecto?
Inspecto shortens the loop between the browser, your editor, DevTools, and AI agents. Start from the page, then move to code or an agent session with the right context already attached.
It gives you four browser-first workflows, from local source lookup to agent automation:
1. Inspect Mode
Click one component and ask AI right away. When you spot an issue or want to modify a specific part of your UI, enter Inspect mode. Click the component, and Inspecto instantly collects its DOM structure and source code context, passing it directly to your connected AI assistant.
2. Annotate Mode
Collect notes across components, then send one structured task. Perfect for design reviews or complex refactoring. Enter Annotate mode to click multiple elements, leave specific instructions for each, and define an overall goal. Inspecto bundles all these notes and their respective contexts into one durable task for your IDE assistant or MCP agent.
When delivery.mode is set to mcp, Annotate mode also shows a browser-side session timeline. You can see when the task is queued, acknowledged by the agent, updated through progress replies, and finally resolved or dismissed—without leaving the page.
Quick Annotation Workflow If you are already in
 Inspect mode, you can seamlessly transition to Annotate mode by simply clicking the "+" button on the menu. This allows you to quickly add the current element to a batch without leaving your flow.
3. Quick Jump
Use Alt + Click to open the exact source location. Skip the manual searching in your editor. Simply hold
 Alt (or Option on Mac) and click any element in your browser. Inspecto will instantly open your IDE right at the exact file, line, and column where that component is defined.
4. Custom Workflows
Turn project-specific commands into browser buttons. Define kind: "workflow" entries in .inspecto/prompts.json, such as Deploy Preview, Review & PR, or Release Notes. Inspecto sends the configured instruction, current annotation context, and project metadata to the agent as a workflow session. The agent then uses its own skills, MCP servers, and tools to execute the task, while progress still streams back to the browser timeline.
Instead of bouncing between the browser, DevTools, your editor, and AI chat, Inspecto keeps the handoff tight. You stay on the page, target the component you care about, and move to code or AI with the right context already attached.
For setup, Inspecto supports automated onboarding integrations for popular AI assistants. The fastest path is to install the matching onboarding integration from your terminal. Inspecto will open the setup instructions right inside your IDE, let the assistant complete the setup, and apply the configuration for you.
Why Inspecto?
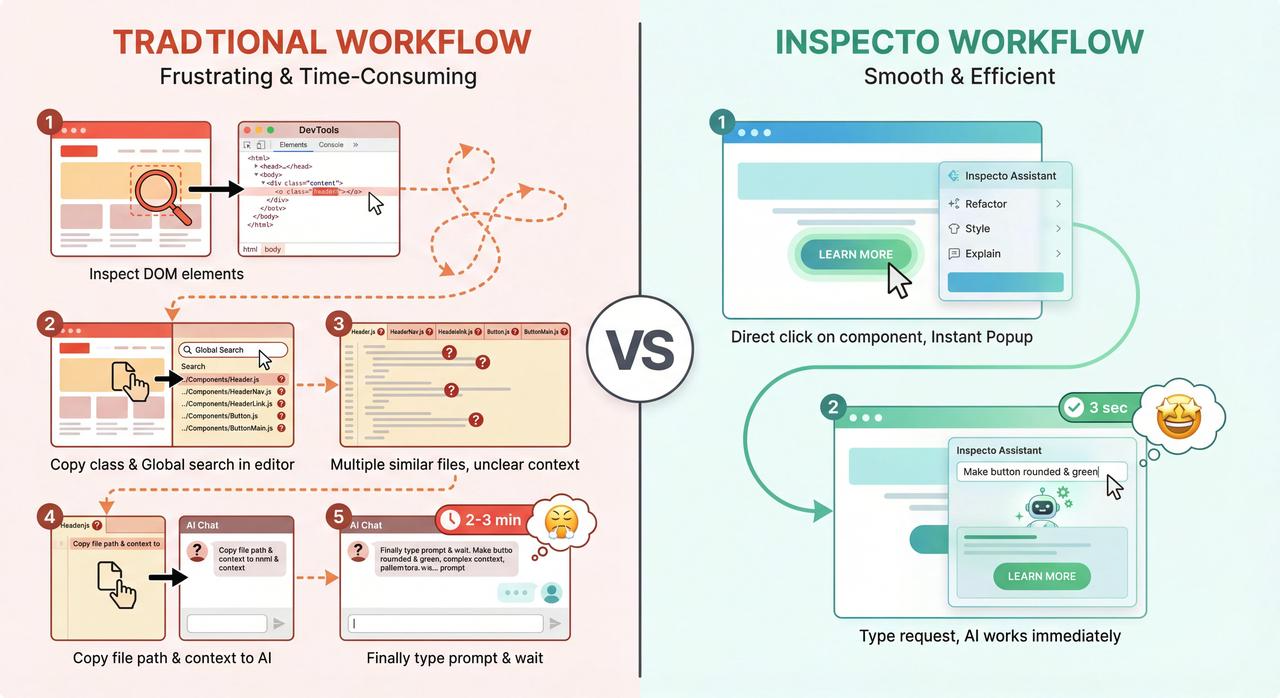
In a traditional development workflow, when you need to debug a UI component and ask AI for help, you usually go through a tedious process. Inspecto fully automates this:
| Pain Point | Traditional Debug Workflow ❌ | Inspecto Workflow 🚀 |
|---|---|---|
| 🔍 Locating Code | Press F12, inspect the element, then manually search in the IDE | Use Quick jump or Inspect mode to open the relevant location faster |
| ✂️ Copying Context | Manually collect code, runtime clues, and UI details | Inspecto builds the relevant context from the page and source automatically |
| 🤖 Invoking AI | Open AI chat, paste snippets, and explain what the component is | Ask directly from Inspect mode or send one structured task from Annotate mode |
| 🧭 Tracking Agent Work | Guess whether the agent has received or acted on your request | Follow MCP task status and progress replies from the in-browser session timeline |
| 🧩 Custom Automation | Remember project-specific deploy, PR, or release instructions | Add workflow buttons that hand instructions to agents with their skills/tools |
| ⏱️ Flow Cost | Frequent context switching breaks your train of thought | The browser becomes the starting point for source lookup, AI handoff, and workflows |
How it Works
Inspecto operates across three different layers of your development environment:
1. Compile Time (The Plugin)
During development, the @inspecto-dev/plugin intercepts your framework's compilation process (via Vite, Webpack, Rspack, or Astro's integration pipeline). It analyzes your React JSX, Vue SFC, Svelte, Solid, and Astro components and adds source-location metadata to rendered DOM elements. For most frameworks this is the hidden data-inspecto="file:line:col" attribute. For Astro, Inspecto also understands the framework's own source metadata emitted in development.
2. Runtime (The Core Client)
The @inspecto-dev/core runs in your browser as a framework-agnostic Web Component overlay. It provides the launcher, Inspect mode, Annotate mode, Quick jump, and the MCP session timeline. When you interact with a component, it reads the available source-location metadata, builds the prompt in the browser, can optionally request snippet context, and reflects agent-side progress back into the annotation sidebar.
3. Dispatch (The Action)
Once the code context is ready, the local HTTP server relays this payload. When snippet context is enabled, the server reads the relevant source file and returns the snippet. Depending on your configuration, the server either triggers a URI scheme to open your IDE Extension, pastes the payload directly into a running CLI process in your terminal, or stores an MCP annotation session that an agent can claim and update.
Key Features
- Zero Runtime Overhead in Production: The AST injection only happens when
NODE_ENV !== 'production'. The attributes are completely stripped out of your production builds. - Framework Agnostic Overlay: The browser overlay uses standard Web Components and Shadow DOM, meaning it will never interfere with your application's CSS or global styles.
- Browser-Side Agent Visibility: MCP annotation sessions expose their lifecycle and agent progress replies directly in Annotate mode, so the page remains the control surface for the task.
- Custom Workflow Buttons: You can define project-specific actions in
prompts.json, such as deploy, PR review, or release, and let the agent execute them with its own skills, MCP servers, and tools. - Highly Configurable: You can customize hotkeys, themes, prompt actions, workflow buttons, and route payloads to different AI providers without changing your code.